Saturday, August 17, 2013

Sexy knobs

When I was in high school I worked at Ann Taylor where I learned about the importance of accessorizing.  It's huge people!  You can take the most blah top and with the right scarf or necklace all of the sudden it looks totally money.  


Same thing with hardware my friends!

I mean, we are dealing with pretty basic cabinetry here and formica counters ...bull nose, no less...and these vintage brass knobs (found on ebay) totally bring in the sassy.


Hubba hubba amirite?


The cool blue, white and grey color scheme just needed some gold to warm it up. 


Seriously, these knobs make me so giddy!

 I carried one in my purse for about 3 weeks while I was painting the kitchen and every once in a while I would just pull it out and let the weight of it sit in my hand while I admired the lovely golden brass hue of it. 

I'm not even kidding.

I may have also made everyone I know hold and admire the knobs too.

Possibly...


PS:  I LOVE BRASS!!


pps:  I love tequila!

 and this stuff is pretty drinkable and real cheap.


Why in the world would I post a photo of my messy cabinets insides?  Other than to remind myself (and now you) of good cheap tequila...

Perhaps, the same reason as why my final reveal photo has a bag of chips and some cheese on the counter.  Because I am a total blogging amateur.


There's still so much more to do in the kitchen so there is a chance I may redeem myself with a clear, well lit, clutter free final final reveal.

Anything is possible.


Saturday, August 10, 2013

Sweat equity in the kitchen

I'm so close to being done here and so far I'm loving the paint colors. I used White Dove (a Benjamin Moore color that I had Dunn Edwards mix for me in their semi-gloss finish) for the uppers.  When I started the project I figured I would just brush the paint on or use a roller.  So I took down the cabinet fronts and painted the frames with a brush which worked out great and then I moved on to the cabinet fronts which I took outside to paint.  My first attempt was with a roller and that left a bumpy finish that didn't really settle after drying...so then I brushed and got streaky brush marks.  I think this may have had to do with the fact that it was 100 degrees out and the paint was drying too fast?  Anyway, after a weekend of that I basically got depressed and gave up. Gorgeous, right?


Then, the next weekend my neighbor came to the rescue with his paint sprayer which he was nice enough to let me borrow.  Total game changer! The resulting finish came out smooth as butter and it went SO much faster!  I was able to jam out all of the white cabinet fronts doing two coats per side on Saturday ...


 I kind of even look like I know what I'm doing here!


 Cut to the overspray on my feet...


On Sunday it rained and it took me an hour just to wipe down and clean the soot off of all of my nice white cabinets.  There were a couple of stains that resulted which I'll have to detail later.  But I was on a deadline to finish the lowers. I went with Valspar's  Jazz Club in gloss (it really looks more like semi -gloss.  But maybe it's because it's latex?)  Again the paint sprayer was a life saver.  Three coats per side and it only took me about 4 hours including drying time.


I didn't hang them for 2 weeks.  Instead I let them dry while I was out of town and hung them I got back.


 Look how cute the curve on the frame is in the new color?  


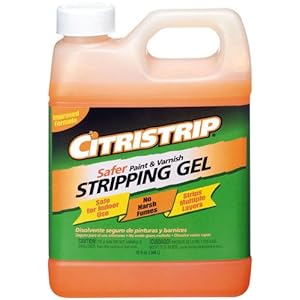
I also removed the vent and used some of this stuff to remove about 12 layers of paint.  It works great and doesn't smell at all.  Just brush on and let it sit for a few hours.  Wipe down and the layers of paint just magically disappear!


Also,  for my feet, I discovered this!


Rub onto painted feet and scrub the paint off.  This worked better than soap and water and was a nice moisturizer too! 

The next day I wised up and put the oil on my arms, legs and feet BEFORE painting and the over-spray came right off in the shower hardly any scrubbing needed. 

Sunday, August 4, 2013

Raw Truffles


You guys these are seriously so delicious!  Besides their outstanding flavor,  they are also vegan, gluten free, (processed) sugar free and full of healthy ingredients.  Dates are full of fiber, minerals and vitamins and their natural sugar content gives you a nice burst of energy.  Walnuts are high in protein, antioxidants and healthy fats. Cocoa is low in  sugar and fat and high in health-protecting and disease-fighting flavonoids.  Maca is a Peruvian super food that is said to balance hormones and increase fertility.  You can read more about it here


Basically, what I am saying is, you need to make these.  It's for your health people!


Here’s what you need:


12-13 large Medjool dates –pits removed

1 ½ cups raw walnuts

Pinch of sea salt

1/3 cup unsweetened cocoa powder

little bit water


Optional:

1 tsp vanilla extract

1 tsp maca powder

Coating:

½ cup raw shredded coconut (or more cocoa powder , or some almond meal)


In a food processor grind up the walnuts until they are a fine meal. Add the dates, salt and cocoa powder (plus vanilla, maca or whatever you want to sub in for these) and pulse until combined.  While the motor is running take your  water and add tiny amounts until the dough forms a ball. Be conservative here or the mixture will be too runny.


Roll about a Tablespoon the date mixture between your palms to form a ball and set aside until you are done with all of the dough.

Wash hands and roll the balls in a plate of shredded coconut (or cocoa or nuts).  This keeps them from sticking  together  when you store them.  I keep them in the fridge in a Tupperware and they stay fresh for at least a week.